OCX Hikari Private Usage Flow
OCX Hikari Private Usage Flow Overview
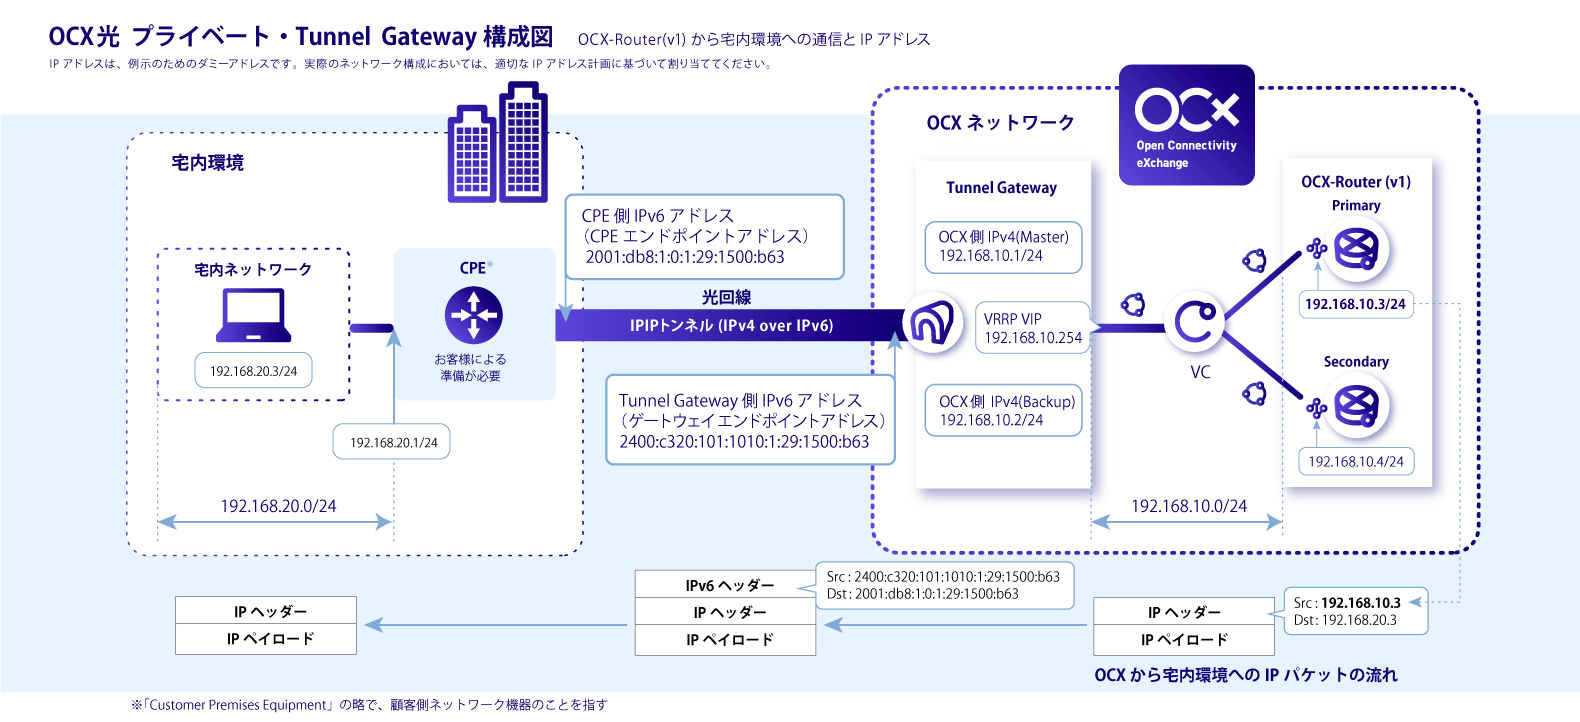
OCX Hikari Private provides a connection between the OCX private network and the customer's on-premises environment using a FLET'S line. Once the OCX Hikari Private application is submitted and IPoE provisioning and line construction are complete, you can connect the OCX private network to your on-premises environment via the FLET'S line using a Tunnel Gateway. The Tunnel Gateway serves as the tunnel endpoint for establishing an IPIP tunnel (IPv4 over IPv6) on the IPoE-enabled FLET'S line.
For a glossary of terms related to using OCX Hikari Private, please check the following link: OCX Hikari Private Glossary
OCX Hikari Private and Tunnel Gateway Configuration Diagram
[Diagram showing the connection between the on-premises CPE, the FLET'S/IPoE network, and the OCX Private Network via a Tunnel Gateway and Virtual Circuit]
OCX Hikari Private Usage Flow
- OCX Hikari Private Usage Flow Overview
- OCX Hikari Private and Tunnel Gateway Configuration Diagram
- OCX Hikari Private Usage Flow
1. Application for OCX Hikari Private Line
To connect OCX Hikari Private to the OCX private network, you must first apply for OCX Hikari Private, and both IPoE provisioning and line construction for the FLET'S line must be completed. Please check here for the application (creation) procedure for OCX Hikari Private.
After applying, you can check the application status and line usage status on the OCX Hikari Private Line Information List screen.
For information regarding usage fees and the billing start date for OCX Hikari Private, please refer to the following link: About OCX Hikari Private Fees and Billing Commencement
2. Selection and Preparation of CPE for On-premises Environment
Prepare the CPE (Customer Premises Equipment) to be placed at the customer site where FLET'S is installed. The CPE must support IPIP tunneling (IPv4 over IPv6). For details, please refer to [CPE Compatible Models and Config Settings].
3. Designing the IPv4 Interface for the Tunnel Gateway on the Private Network
When creating a Tunnel Gateway, customers must specify the IPv4 interface that connects to the OCX private network; therefore, it is necessary to design the IPv4 interface in advance. The IPv4 interface utilizes VRRP. For this reason, you must design the network so that the Local IPv4 Address (Master), Local IPv4 Address (Backup), and VRRP Virtual IPv4 Address all exist within the same network address range.
Static routing can be configured on the IPv4 interface. Creating Static Route If dynamic routing is required, we provide OCX-Router(v1), which allows for BGP peer configuration. If you require BGP peer settings, we recommend connecting via OCX-Router(v1). OCX-Router(v1) Overview
4. Creating the Tunnel Gateway
Create the Tunnel Gateway by specifying the designed IPv4 interface. Refer to Creating Tunnel Gateway for the creation method. Once the Tunnel Gateway is created, a Gateway Endpoint Address (the OCX-side IPv6 endpoint address for the IPIP tunnel) will be automatically generated. Please check the portal site for the generated Gateway Endpoint Address. This address is used as the remote address for the IPIP tunnel (IPv4 over IPv6) in the CPE configuration.
About Tunnel Gateway Constraints
5. Connecting the Tunnel Gateway and OCX Hikari Private Line
Once the Tunnel Gateway is created, it must be connected to the OCX Hikari Private line. For details, please see Connecting the Line. The status of the OCX Hikari Private line to be connected must be available. Check the Line Information List to verify the line status. After the connection is complete, a CPE Endpoint Address (the CPE-side IPv6 endpoint address) will be generated. One CPE Endpoint Address is issued from the IPv6 prefix. Please check the portal site for the generated address. This address is used as the local address for the IPIP tunnel (IPv4 over IPv6) in the CPE configuration.
About Connected Line Constraints
6. Connecting to a VC
By connecting a VC (Virtual Circuit) to the Tunnel Gateway, it is possible to establish an L2 network connection with other OCX resources. For details, please see Virtual Circuit (VC) Destination Setting (Attach).