Creating a Physical Port
This page explains how to create a Physical Port using the OCX Portal.
A Physical Port serves as the connection point to the OCX network and must be created at each site where you intend to transfer traffic.
Preparation
Please confirm the following before creating a Physical Port:
- Your User Role is either
adminoruser. - You must have (or plan to procure) an on-premises connection device and a connection route to the data center hosting the OCX network.
Remarks
- MTU Size: The maximum Ethernet frame size accepted by Physical Ports currently provided by OCX is 8,926 bytes. Frames exceeding this size will be dropped rather than fragmented by OCX equipment, as the port specification is a Layer 2 type.
- Port Settings: For the connection between the Physical Port and your equipment, please disable Auto Negotiation and fix the Duplex to Full Duplex if your equipment allows it. Some devices may fail to link up or communicate properly if Auto Negotiation is left ON.
- Fiber Type: Use Single-Mode Fiber (SMF) for the connection. While the specific grade (OS1/OS2) is not restricted, fibers with different expected wavelength ranges (such as dispersion-shifted fibers) may affect communication. Please use SMF compatible with 1000BASE-LX or 10GBASE-LR.
- Physical Contact: Optical fiber physical contacts are provided with SPC or UPC polishing. Please use fibers with SPC or UPC polishing for cross-connects. APC polishing is incompatible and will degrade optical characteristics, affecting communication.
- Attenuators: Attenuators are permitted for cross-connect sections or customer equipment. However, please adjust the received optical power on the OCX equipment side to fall within the following ranges:
Media Min Receive Power Max Receive Power 1000BASE-LX -19.0 dBm -3.0 dBm 10GBASE-LR -14.4 dBm +0.5 dBm - Traffic Restrictions:
- BUM (Broadcast, Unknown unicast, Multicast) traffic is limited to 0.1% of the physical bandwidth.
- STP (Spanning Tree Protocol) is not supported as BPDU frames are filtered.
- System Load: Please refrain from actions that impose an excessive load on OCX, as this may affect other customers. If actions causing excessive load (e.g., connecting a tester to apply high-volume test traffic) or significant disruption are discovered, we may restrict service provision without prior notice.
Procedure for Creating a Physical Port
-
Log in to the OCX Portal.
-
Click [Physical Ports] from the left navigation bar.
-
On the Physical Ports list page, click [Create].
-
The information entry screen will appear. Fill in the following items and click [Create]. Items marked with an asterisk (*) are required.
- Site (DC): Select the OCX network site (Data Center) based on your connection device/route evaluated in Preparation - 2. See the list of sites here.
- Name: Enter an arbitrary name (max 40 characters) for easy identification.
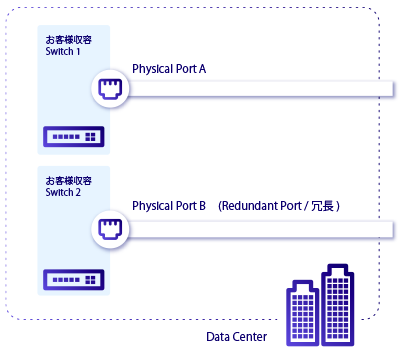
- Port Redundancy: If turned ON, you can select an existing Physical Port from the dropdown menu to ensure the new port is created on a different hardware chassis within the same DC. This is effective for avoiding single points of failure.
- Speed (Bandwidth): Select from the options below. Ensure your network equipment supports the corresponding media type.
Speed (Bandwidth) Media 1 Gbps 1000BASE-LX 10 Gbps 10GBASE-LR
-
A [Confirm Creation] pop-up will appear. Review the costs and click [Create].
-
The Physical Ports list will be displayed. Confirm that the status of the new port is
ordered. -
Once created, you must issue a Letter of Authorization (LOA), which indicates the demarcation point. For the LOA issuance procedure, please refer to this page.
-
Submit the LOA to the data center operator specified in Step 4 and request the establishment of a physical cross-connect from your equipment to the OCX Physical Port.
-
After the cross-connect is established and link-up is confirmed, the status will change to
availablewithin a maximum of 24 hours.- Note: You can use "Manual Activation" to activate the port before the physical link-up. See Manual Activation of Physical Port.
Once the status changes to available, you can begin creating VCIs on that Physical Port. Refer to Creating a VCI for details.
Remarks
The following image illustrates the configuration for Port Redundancy:
Notes
Billing begins as soon as the Physical Port status changes to available.