Creating Additional Prefix
This page explains the Create Additional Prefix function on the OCX Portal.
Preparation
Please confirm the following before adding a prefix:
- Your User Role is either
adminoruser.
Procedure for Creating an Additional Prefix
-
Log in to the OCX Portal.
-
Click [Internet Connections] from the left navigation bar.
-
On the Internet Connections page, click the target Internet Connection resource.
-
A detail screen will appear at the bottom of the page. Switch to the [Additional Prefix] tab and click the [Create Additional Prefix] button.
-
The screen will switch to the creation steps. Configure the input items as follows and click [Create]. You must enter at least one of either the IPv4 Next Hop or IPv6 Next Hop.
-
IPv4 Next Hop
- Enter an IPv4 address (e.g., 192.168.0.1).
- Set this within the range of the IPv4 prefix (/29) assigned on the Internet Connection details screen.
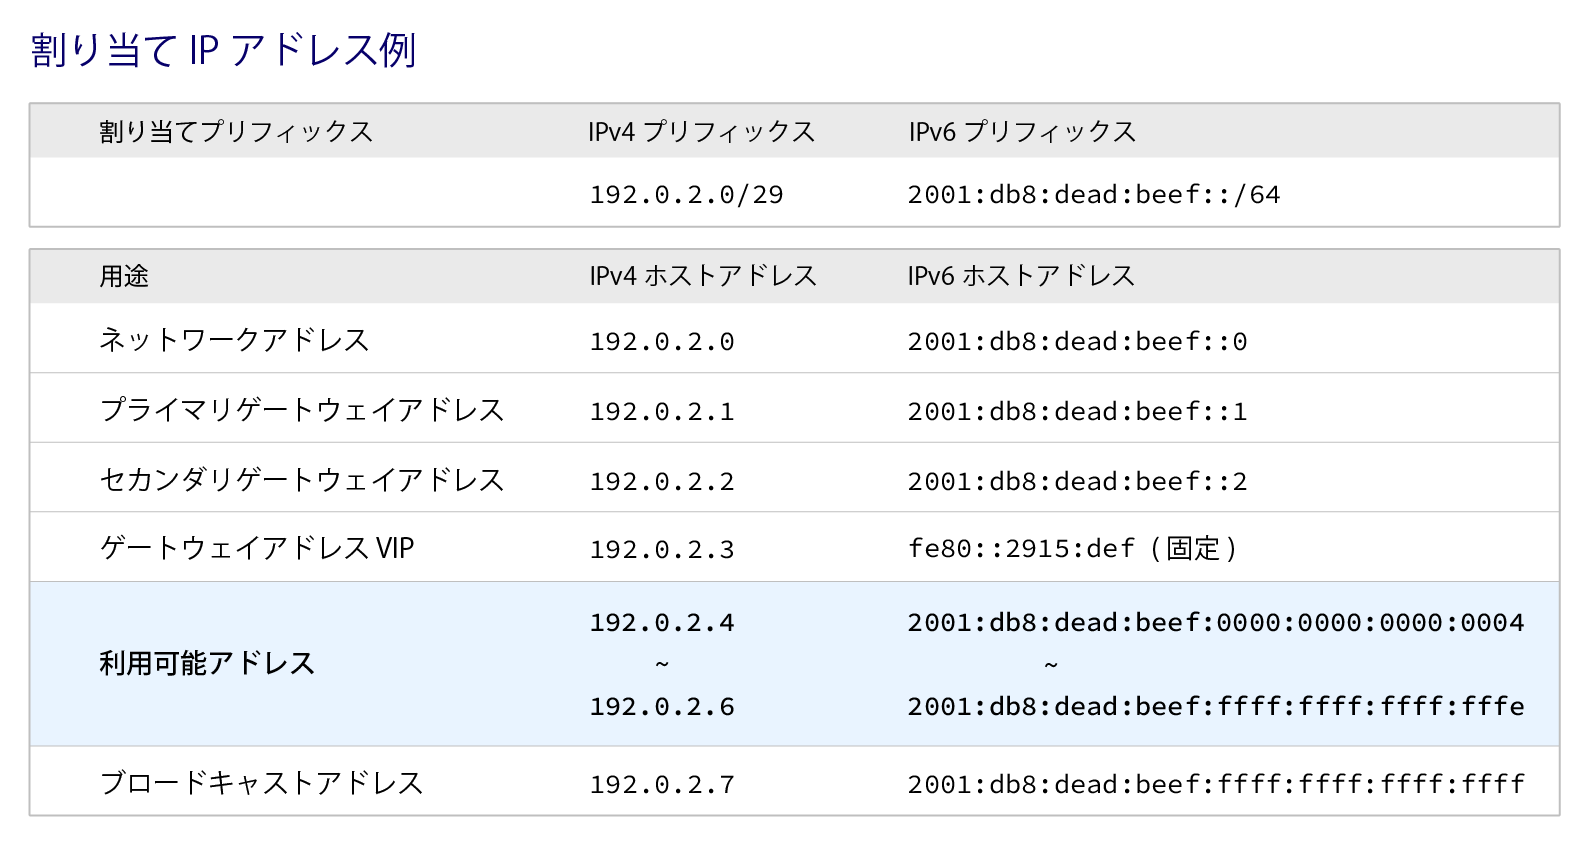
- Note that the first four IP addresses in this range are reserved by the OCX system as the Network Address, IPv4 Gateway VIP, Primary IPv4 Gateway Address, and Secondary IPv4 Gateway Address, respectively, and cannot be used.
- Additionally, the last IP address in the range is reserved as the Broadcast Address and cannot be used.
- For more details on the usable IP address range, please refer to Supplement: Assignable IP Address Range for Next Hop.
-
IPv6 Next Hop
- Enter an IPv6 address (e.g., 2001:db8::dead:fffe).
- Set this within the range of the IPv6 prefix (/64) assigned on the Internet Connection details screen.
- Note that the first four IP addresses in this range are reserved by the OCX system as the Network Address, IPv6 Gateway VIP, Primary IPv6 Gateway Address, and Secondary IPv6 Gateway Address, respectively, and cannot be used.
- For more details on the usable IP address range, please refer to Supplement: Assignable IP Address Range for Next Hop.
-
-
A confirmation pop-up will appear. Review the settings and click [Create].
-
The Additional Prefix list will appear at the bottom of the screen, displaying your newly created prefix.
This completes the creation of the additional prefix.
Remarks: Assignable IP Address Range for Next Hop
As shown in the "Example IP Address Allocation" table below, certain IP addresses are already reserved by the OCX system. The range of IP addresses that can be set as the next hop for an additional prefix is described in the Usable Address section. *The table below is an example only. Please check the Internet Connection details screen for your actual assigned IP addresses.